Frequently Asked Questions
This page contains answers to your questions. Please send new questions
to me by email.

10. How do I restore the
dark grid lines on my sterling silver grid 75 pen?
February 1, 2004
Parker used two different approaches in darkening the grid lines on the
sterling silver 75. One was by using some black material, and the other by
aging the sterling silver in the lines. You can restore by using the
second method which is simpler.
A compound called as "liver of sulphur" is available in powder or
solution form from art
stores. It is an oxidizer for silver that is commonly used to give
metal collectibles an antique appearance they call patina. You can do the
same on your Parker 75 pen. Be forewarned, this working solution stinks so
you should use it in an open area or you may be overcome by the fumes.
To use it, apply it over the entire pen cap or barrel and allow the solution
to oxidize the surface and lines until it is as dark as you want the lines to
appear. Depending on the strength of this solution, it may be very
quick. Once the desired color is attained, quickly rinse off with water to
stop the oxidation process.
The next step is to polish the surface using the silver
polishing cloth
suggested earlier. Be gentle
when polishing so that you may leave the dark color in the grid lines.
One last suggestion. The solution of liver of sulphur has a shorter
shelf life. Given a choice between powder or solution for the same
price, choose the powder form since you can mix it whenever needed. Just
follow the instructions to dissolve the powder in hot distilled water to make
your own solution.
Update of February 7, 2004
I received an excellent suggestion from a contributor to this website .
He wrote to say that you can also accelerate the oxidation if you simply put the
sterling silver cap or barrel in a new rubber sac of an appropriate size.
Apparently the sulphur in the rubber is enough to oxidize the silver but at a
rate that is a bit more controllable than using a liver of sulphur solution.
Also, for a bit more aggressive polishing than the silver
polishing cloth you can use a 6000+ grit micro- surface micromesh but do so
very gently.
Update of July 15, 2006
Sam Fiorella from Pendemonium wrote
to me about the sac sizes:
"A #22 sac is a snug fit, but can be worked on around the cap and/or
barrel of a 75 FP or RB, easy fit for BP or MP. The #23 1/2N sac
slides over the FP & RB easiest, BUT, the neck of the sac has to be trimmed
off first so it will fit. The 22 sacs are about 3 inches long, so one on
each end of pen fits over FP, RB, BP or MP. The 23 1/2N when cut is only
2.25 inches, so it would take 3 of them to completely cover any instrument, with
one in the center would need to be cut open at both ends. There are
very slight variances in the length of the sacs, minimal though."
From what she wrote, perhaps the best way is to use three 23 1/2N sacs as she
suggests and put the pen with sac into a sealable plastic sandwich bag.
Write to her if you want to place an order for these sacs by clicking here.
Back to Top
11. How do I remove the
nib assembly from the section?
April 29, 2004
It is simple but you need to be gentle to avoid breaking the
unexposed portion of the nib assembly. Here are the steps.
- Rinse the nib and section so that there are no more traces
of ink in the water.
- Use a wide rubber band to get a better grip on the exposed nib.
Use your thumb and finger of one
hand to hold the nib static while the other hand holds on the black plastic section, and gently try to rotate the
section relative to the nib assembly, in a back and forth manner.
- If the nib assembly seems stuck, then soak in it warm water
standing the nib and section with the nib down in water that just goes up to
where it meets the section. Put some water from the other end of the
section. I would say to let it stand like that overnight.
Back to Top
12. Now that I disassembled
them, how do I clean my FP gripping section and nib assembly?
May 22, 2008
OK so you followed the above FAQ to separate the nib assembly
from the gripping, here's how you clean each.
Nib assembly:
- Rinse it and drop it into a small cup of warm
water.
- Periodically throw out the inky water and replace with
clean warm water.
- Repeat the above steps until your cup of water has no more
ink color.
Gripping section:
- Remove the ink cartridge or converter so you are only
dealing with the gripping section.
- Rinse under slow running warm water from the converter end
until you see only slight ink color.
- Place the section standing in a cup filled with warm water
that is shallow enough just to get the water to the chrome ring without
going to the plastic.
- Leave for 15-30 minutes until you see the ink color in the
water.
- Repeat steps 3 and 4 until the water shows very little ink
color.
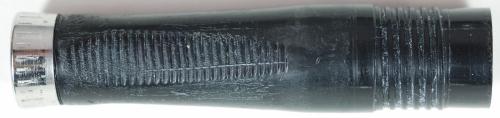
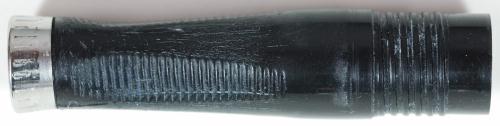
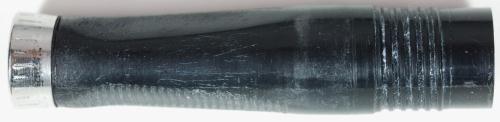
A few words of caution
- Do not let the gripping section become immersed in the
water for a long time. The plastic develops this smoky white
discoloration if the entire section becomes immersed for more than an hour.
- Do not you use alcohol to rinse the section. The
white discoloration occurs quickly when the section is exposed to alcohol as
you can see below.
Photos updated June 8, 2009
Back to Top
13. How do I improve the ink flow
through my nib?
June 30, 2012
After following FAQs #11 and
#12 above for a thorough cleansing, you
can now re-assemble the nib with its section and converter. Before you
fill with ink, however, fill it with a solution of 90% water mixed with 10% hand
dishwashing liquid soap (don't use machine liquid which is gritty). Leave the
solution for 15 minutes then empty and wipe the nib and section dry, You
can then refill with ink.
The purpose of this exercise is to coat the interior surface
of your section with a surfactant. This chemical will lower the surface
tension of ink to the interior and will promote better ink flow.
I suggest you perform this thorough cleaning of your nib and
section, and this pre-fill of the surfactant solution once every 6-9
months. Doing this will keep your pen in top operating condition.
One final note. Many people come to me in need of
replacement sections because the metal band has corroded or become
unsightly. In a few extreme cases, the band has completely fallen off the
section.
To prevent this situation and minimize the corrosive effects of
ink on the metal band of your section, don't let dried ink remain for long
periods. Wipe the dried ink off your metal band whenever you see it.
Back to Top
14. How can I insure the
longevity of my FP gripping section?
December 31, 2013
Over the years I have seen
two repeating problems with Parker 75 FP gripping sections. The end result
is that you will likely need to replace the section, which is expensive nowadays
since the part has not been made in several decades, more so the triangular grip
US version with wide metal band than the rounded French version with the thin
gold colored band.
Here are descriptions of the
problems and my suggestions that
will help your FP gripping sections last as long as possible.